
If you’ve ever wandered through a gourmet food store or browsed a high-end restaurant menu, you’ve likely encountered Black Garlic. This mysterious ingredient, with its deep, almost black color and sweet, complex flavor, has been captivating food enthusiasts worldwide. But here’s the secret: you don’t need to pay premium prices or hunt through specialty stores to enjoy it. Making this culinary delicacy at home is surprisingly simple, and today, I’m going to show you exactly how to do it.
Listen To The Podcast Now!
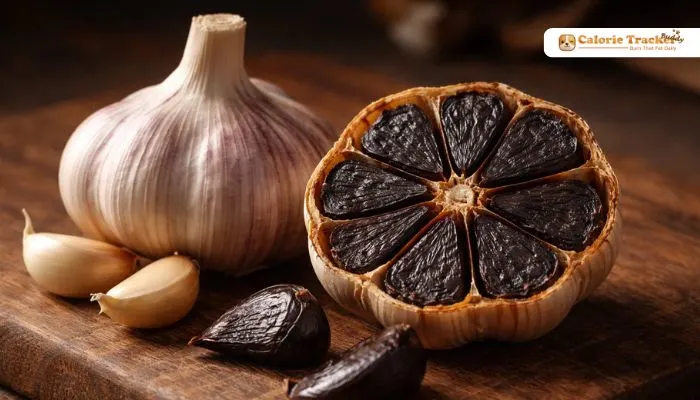
What Is Black Garlic?

Before we dive into the preparation process, let’s understand what is black garlic and why it has become such a sought-after ingredient. Unlike what many people assume, it isn’t a special variety of garlic. Instead, it’s regular white garlic that has undergone a fascinating transformation through a process called the Maillard reaction, which also contributes to the development of immunity-boosting properties in foods.
This transformation occurs when fresh garlic bulbs are aged under controlled temperature and humidity conditions for several weeks. During this time, the garlic’s enzymes break down, converting the sharp, pungent compounds into sweet, savory, and slightly tangy flavors. The cloves turn jet black, develop a soft, almost jelly-like texture, and lose that characteristic raw garlic bite entirely.
The result is an ingredient that tastes nothing like its original form. Think of it as balsamic vinegar meets molasses with hints of tamarind, complex, umami-rich, and incredibly versatile in the kitchen. This unique transformation makes it an excellent addition to your Immunity Booster Food list.
Black Garlic Benefits: Why You Should Make It?

Beyond its extraordinary flavor, there are compelling Black Garlic benefits that make it worth incorporating into your diet. The aging process actually enhances many of garlic’s nutritional properties. It contains double the antioxidants of fresh garlic, particularly S-allyl-cysteine, which is more easily absorbed by the body.
Research suggests it may support cardiovascular health by helping maintain healthy cholesterol levels and promoting better circulation. Its anti-inflammatory properties are more pronounced than regular garlic, and it’s packed with compounds that support immune function.
Plus, because the aging process breaks down the harsh compounds, it’s much gentler on the digestive system, and you won’t experience that infamous garlic breath or stomach discomfort.
How To Make Black Garlic: The Complete Process?

Now, let’s get to the main event. Here’s how to make black garlic in your own kitchen with minimal effort and equipment.
What You’ll Need?
- Fresh garlic bulbs (as many as your equipment can hold, whole, unpeeled)
- A rice cooker, slow cooker, or dehydrator
- Patience (this is the hardest ingredient!)
Step-by-Step Instructions:
Week 1: The Setup:
Choose the freshest, firmest garlic bulbs you can find. Avoid any with soft spots or sprouting cloves. Keep the bulbs completely intact with their papery skins on; this protects the cloves during the aging process.
If using a rice cooker, place it in a well-ventilated area like a garage, basement, or outdoor space. The smell during the first week can be quite strong, similar to roasted garlic amplified tenfold. Wrap each garlic bulb loosely in aluminum foil to help retain moisture.
Set your rice cooker to “warm” mode. For slow cookers, use the “warm” or lowest setting. If using a dehydrator, set it to 140°F. Arrange the wrapped bulbs inside, close the lid, and walk away.
Weeks 2-3: The Waiting Game:
This is where patience becomes your virtue. For the next 2-3 weeks, simply leave the garlic undisturbed. You can check on it after two weeks by unwrapping one bulb. The cloves should be turning brown and softening. If they’re still mostly white or light tan, give them another week.
The transformation timeline varies based on your equipment and the size of your garlic bulbs. Smaller bulbs may be ready in 18-21 days, while larger ones might need a full month.
Week 3-4: The Reveal:
After 3-4 weeks, check your garlic. The cloves should be completely black or very dark brown, soft to the touch, and have that characteristic sweet aroma. If you unwrap a bulb and find the cloves are sticky, chewy, and dark, congratulations, you’ve successfully made it!
Remove the bulbs from the heat and let them cool completely. You can store them in their skins in an airtight container in the refrigerator for up to one month, or peel the cloves and store them in olive oil for easier use.
Troubleshooting Common Issues:
Sometimes things don’t go perfectly. If your cloves are dry and hard rather than soft and sticky, the temperature was too high, or the humidity was too low. Try wrapping them more securely next time. If they’re mushy and smell off, they’ve likely overheated or gotten too moist. This rarely happens, but it means you should discard that batch.
The ideal result has cloves that are pliable, slightly sticky, and deeply flavorful without any bitterness or off-putting odors.
Also Read:
How To Select and Prepare Fresh Oysters At Home?
Immunity Booster Food: Your Complete Guide To Stronger Defenses
Track Your Nutrition with Calorie Tracker Buddy:
![]()
As you start incorporating this nutritious ingredient into your meals, you might wonder how it affects your overall nutrition. This is where Calorie Tracker Buddy becomes an invaluable tool in your health journey.
Calorie Tracker Buddy helps you monitor not just calories, but the complete nutritional profile of your meals. When you’re adding ingredients like this to your diet for health benefits, it’s important to track how they contribute to your daily nutrient intake. The app allows you to log custom ingredients, track antioxidant-rich foods, and see how small additions impact your overall wellness goals.
Whether you’re managing your weight, tracking specific nutrients, or simply trying to eat more mindfully, Calorie Tracker Buddy makes it effortless. You can scan foods, create custom recipes with your homemade ingredients, and get detailed insights into your eating patterns. The app’s user-friendly interface means you can quickly log your meals without disrupting your routine, making it perfect for anyone serious about their health.
Black Garlic Recipes: Delicious Ways to Use Your Creation:

Now that you’ve made your own batch, let’s explore some black garlic recipes that showcase its unique flavor profile.
1. Simple Spreads and Dips:
Mash several cloves with softened butter, a pinch of sea salt, and fresh herbs for an incredible compound butter. Spread it on crusty bread, melt it over steak, or toss it with pasta. You can also blend it with cream cheese, Greek yogurt, or ricotta for a sophisticated dip that pairs beautifully with vegetables or crackers.
2. Savory Mains:
Add whole or minced cloves to stir-fries during the last minute of cooking. The heat releases even more of those complex flavors. Incorporate it into marinades for chicken, pork, or tofu; it adds depth without overpowering other ingredients. For a show-stopping dish, stuff chicken breasts with a mixture of this ingredient, sun-dried tomatoes, and goat cheese.
3. Elevated Basics:
Transform simple dishes by whisking mashed cloves into vinaigrettes, blending them into hummus, or stirring them into mashed potatoes. Even a basic tomato sauce becomes restaurant-quality when you add a few cloves toward the end of cooking.
Storage and Shelf Life:
Properly stored unpeeled bulbs will last about a month in the refrigerator. Peeled cloves stored in olive oil can last up to two weeks refrigerated. For longer storage, you can freeze whole peeled cloves on a baking sheet, then transfer them to a freezer bag; they’ll keep for up to six months.
Conclusion:
Making Black Garlic at home is truly easier than you think. With just fresh garlic and a simple heating device, you can create a culinary treasure that costs a fraction of retail prices. The three-to-four-week process requires no active work from you, just patience while the magic happens. Once you taste that first sweet, umami-rich clove, you’ll understand why it has taken the culinary world by storm. Start your first batch today, and in a month, you’ll have a versatile ingredient that elevates everything from weeknight dinners to special occasions.
FAQ’s:
Q1: How long does it take to make this at home?
Ans: The process typically takes 3-4 weeks of continuous heating at low temperatures. The exact time depends on your equipment and garlic size.
Q2: Does it smell bad while making it?
Ans: During the first 5-7 days, there’s a strong roasted garlic aroma. Place your cooker in a ventilated area away from living spaces.
Q3: Can I eat it every day?
Ans: Yes! It’s gentler on the digestive system than raw garlic and can be consumed daily. Many people eat 1-3 cloves per day for health benefits.
Q4: What’s the difference in taste compared to regular garlic?
Ans: It has zero pungency or sharpness. Instead, it’s sweet, savory, and slightly tangy with notes of balsamic vinegar and molasses.